How to Set Up IPTV on macOS
Setting up IPTV on your Mac is one of the easiest ways to enhance your streaming experience. Forget about cable bills and endless commercials. With IPTV Smarters Pro, you can access a huge selection of shows and live channels directly on your Mac. I’ll guide you through the process step by step. Let’s get started!
Step 1: Download IPTV Smarters Pro for Mac
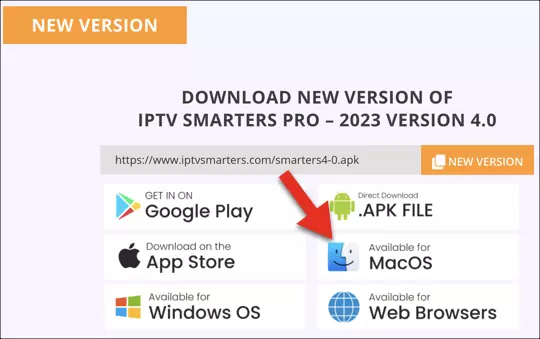
The first thing you need to do is download the IPTV Smarters Pro app for Mac. It’s quick and easy — you can get it directly from the official website. Look for the macOS version, click Download, and that’s it. Once it’s on your Mac, you’ll have access to live channels, movies, and TV shows all in one place. Trust me, it’s a total game-changer once you set it up. Just follow the instructions on the website, and you’ll be ready to start enjoying your favorite content in no time.
Step 2: Allow Apps from Unidentified Developers
https://www.youtube.com/results?search_query=+Permitir+Aplicaciones+de+Desarrolladores+No+Identificados
If you use a Mac, you’re probably familiar with the security feature that prevents installing apps from unidentified developers. It’s there to protect you, but in this case, you’ll need to disable it so everything works properly.
Here’s how to do it:
- Go to System Preferences and click Security & Privacy.
- Once inside, unlock the settings using your administrator password.
- In the General tab, find the option that says “Allow apps downloaded from” and change it to Anywhere.
- If that option isn’t visible, don’t worry. Open the Terminal app and type this command: sudo spctl –master-disable
Press Enter and enter your password. That’s it! You can now install apps without restrictions.
Don’t forget to lock your settings again afterward to keep your Mac secure.
Step 3: Install IPTV Smarters Pro
Once you’ve downloaded the app, go to your Downloads folder and find the IPTV Smarters Pro file. Double-click it and follow the on-screen instructions. The installation should only take a few minutes.
When it’s done, you’ll find the app in your Applications folder. Double-click to open it — and you’re almost ready to go. The interface is clean and easy to navigate, so you’ll feel right at home in no time. You’re just a few steps away from enjoying a whole world of entertainment!
Step 4: Add Your IPTV Login Information
Now comes the fun part — signing in! You’ll need the username, password, and server URL provided by your IPTV provider. This information is usually sent to you by email or WhatsApp.
Once you have these details, open the IPTV Smarters Pro app and enter them. Click Add User once everything is filled out, and you’re all set. That’s it! You can now start exploring all the live channels, movies, and shows available to you. It’s like a whole new world of TV right on your Mac.
Conclusion
If you run into any issues during the process or can’t get it set up properly, don’t worry — that’s completely normal. Just contact the technical support team for assistance. You can reach them via WhatsApp, and they’ll guide you step by step. They’re great at solving problems and will make sure everything works smoothly.
And that’s the whole process — pretty simple, right? Now go ahead and enjoy all the content you’ve been waiting for, directly on your Mac. Let me know how it goes, and if you need any help, I’m here to answer your questions!


